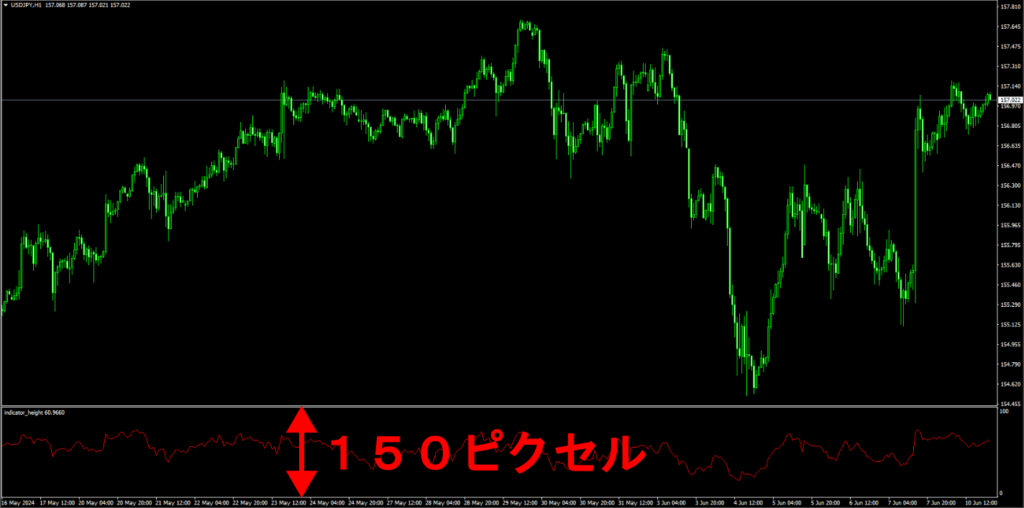
MQL4では、カスタムインジケーターを作成する際に、インジケーターの表示方法や動作を設定するために#propertyという命令を使用します。
その中の一つであるindicator_separate_windowは、インジケーターが価格チャートとは別のウインドウに表示されることを指定します。その際にindicator_heightを使用することで、インジケーターウインドウの高さを指定することができます。
具体的な例としてRSI(Relative Strength Index)インジケーターを表示する方法で解説します。
サンプルコード全文
indicator_separate_windowとindicator_height使用し、iRSI関数を利用してRSIインジケーターを表示するコードになります。
|
1 2 3 4 5 6 7 8 9 10 11 12 13 14 15 16 17 18 19 20 21 22 23 24 25 26 27 28 29 30 31 32 33 34 35 36 37 38 39 40 41 42 43 44 45 46 47 |
//+------------------------------------------------------------------+ //| indicator_height.mq4 | //| Copyright 2024, 潤奈FX | //| https://zyunafx.com/ | //+------------------------------------------------------------------+ #property strict // インディケーターの設定 #property indicator_separate_window //インジケーターをサブウインドウに表示 #property indicator_height 150 //サブウインドウの高さを指定 #property indicator_minimum 0 //サブウインドウの表示範囲の下限 #property indicator_maximum 100 //サブウインドウの表示範囲の上限 #property indicator_color1 clrRed //インジケーターの表示色を赤色に指定 // インディケーターのバッファ double rsiBuffer[]; //+------------------------------------------------------------------+ int OnInit() { // バッファの初期化 SetIndexBuffer(0, rsiBuffer); return(INIT_SUCCEEDED); } //+------------------------------------------------------------------+ int OnCalculate(const int rates_total, const int prev_calculated, const datetime &time[], const double &open[], const double &high[], const double &low[], const double &close[], const long &tick_volume[], const long &volume[], const int &spread[]) { int period = 14; // RSI計算期間 // RSIの計算 for(int i=0; i<rates_total; i++) { rsiBuffer[i] = iRSI(_Symbol, 0, period, PRICE_CLOSE, i); } return(rates_total); } //+------------------------------------------------------------------+ |
コード説明
インジケーターの設定
|
1 2 3 4 5 |
#property indicator_separate_window //インジケーターをサブウインドウに表示 #property indicator_height 150 //サブウインドウの高さを指定 #property indicator_minimum 0 //サブウインドウの表示範囲の下限 #property indicator_maximum 100 //サブウインドウの表示範囲の上限 #property indicator_color1 clrRed //インジケーターの表示色を赤色に指定 |
#propertyはコンパイルする際に使われ、インジケーターの表示方法や見た目を設定します。
indicator_heightで指定している単位はピクセルとなります。
インジケーターのバッファ
|
1 |
double rsiBuffer[]; //インジケーターの値を格納する為の配列 |
インジケーターの値を格納する為の配列をバッファといいます。このバッファを使用して、計算されたインジケーターの値をチャート上に表示します。
インジケーターの初期化関数
|
1 2 3 4 5 6 7 |
int OnInit() { // バッファの初期化 SetIndexBuffer(0, rsiBuffer); return(INIT_SUCCEEDED); } |
OnInit関数は、インジケーターの初期化を行います。SetIndexBuffer関数を使用して、rsiBufferをインジケーターのバッファとして設定します。
これにより、計算された値がこのバッファに格納され、チャートに表示されます。
インジケーターの計算関数
|
1 2 3 4 5 6 7 8 9 10 11 12 13 14 15 16 17 18 19 20 |
int OnCalculate(const int rates_total, const int prev_calculated, const datetime &time[], const double &open[], const double &high[], const double &low[], const double &close[], const long &tick_volume[], const long &volume[], const int &spread[]) { int period = 14; // RSI計算期間 // RSIの計算 for(int i=0; i<rates_total; i++) { rsiBuffer[i] = iRSI(_Symbol, 0, period, PRICE_CLOSE, i); } return(rates_total); } |
OnCalculate関数は、インジケーターの主な計算部分です。ここでは、iRSI関数を使用して指定された通貨ペアと時間枠に対してRSIを計算し結果を返します。
rates_totalはすべてのレート(価格データ)の数を表しており、その数をfor文でループ処理を行うようになっています。
表示イメージ画像

まとめ
indicator_heightを使用することで、インジケーターウインドウの高さを指定する事が出来ます。
ユーザー側で変更して欲しくない時にインジケーターを作成する時に有効になります。
サンプルコードではiRSI関数を使用してRSIを計算し表示していますが、同様の方法でさまざまなインディケーターを作成することができますので試してみてください。


コメント